
Many of us are familiar with Scrivener as an alternative to Word when it comes to plotting, writing, and revising our novels, short stories, etc. In addition to this, I’ve learned how to utilize Scrivener as a tool for my blog as well. I’ve been blogging about TV, movies, books, and Broadway at Hollywood the Write Way for the past nine years. Five years ago, I started using Scrivener for my writing and two years ago, I switched from Blogger to WordPress for my blog. Since the blog’s switch to WordPress, I’ve been slowly playing with Scrivener as an organizational tool in between WIPs and today, I want to share with you what I’ve learned so far.
I love Scrivener because you can use it however you want, it’s easily customizable. Scrivener adapts to the user so there are endless ways as to how to use the software. That said, this is not a how to guide, it’s simply my attempt in showing you one of many options available when it comes to organizing, brainstorming, and drafting for your blog.

* Editorial Calendar – Scrivener itself doesn’t have a calendar that I know about but I simply imported a calendar from the internet into Scrivener to have everything in one place and have made it my editorial calendar to use how I see fit.
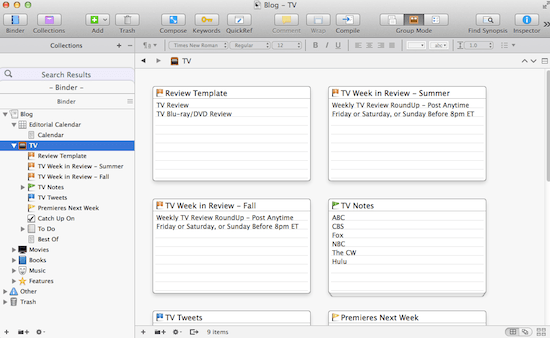
* Cork board – This view gives you an overview through notecards/post its of what you’re working on. The visual aspect of this feature is completely customizable, so each user can have the aesthetics that best suit their work flow.
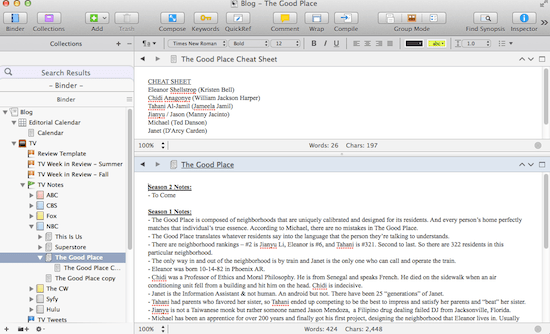
* Split Screen – This comes in handy when I’m watching a TV show that I am taking notes on for a review and I’m not yet familiar with all of the characters, the show has been off the air for awhile and I need a reminder, or I need to double check spelling. I can split screen my notes with my cheat sheet to keep the characters in order. Best of all, users can choose whether to split the screen horizontally or vertically.
* Drafting – I don’t draft my posts in Scrivener but if you want to, I believe you can export your draft by going to File > Compile > Export as MultiMarkdown to HTML or Webpage. Then, open a new post in WordPress, add the title, and then Copy & Paste the Scrivener HTML into WordPress (Visual) and as far as the text of the blog post is concerned, you should be done give or take a little tinkering here and there. You’ll still have to add your photos, SEO details, etc… before publishing. I don’t draft in Scrivener because exporting doesn’t give as clean of an html code as I’d like but I believe there are third party applications to help with that. Though I’m so used to drafting in WordPress/Google Docs, which I’ve never had a problem with, so this isn’t a pressing issue for me. If you do decide to draft in Scrivener, you’ll be happy to know that Scrivener autosaves your work every five seconds, so you’ll never have to worry about losing a single word (which may excite those who struggle with Word crashing). Scrivener is a software that can be used offline and it opens right where you left off every single time. You can also use Scrivener on your mobile device and sync between devices. I only use Scrivener on my Mac so I can’t speak to how well it syncs between devices but it is an option.
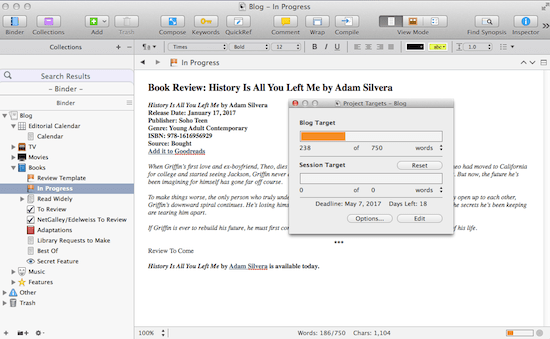
* Set a Deadline for a Post – If you’re only going to draft one post at a time, make sure the only section checked for compilation is the draft that you will export, that way you can set a deadline for the draft that you’ve zeroed in on.
* Create Labels/Statuses for Posts – There are preset statuses and labels available to users but you can change the status or label to anything you want. You can color code the labels as well so for instance, you could create a Green Label for “Scheduled” posts, Yellow for “Drafting” and Red for “Idea.”
* Set a Word Count Goal for Post – Setting a word count goal can help you stay focused on constructing a clear and concise post by giving you a max. word limit to prevent rambling and losing the reader.
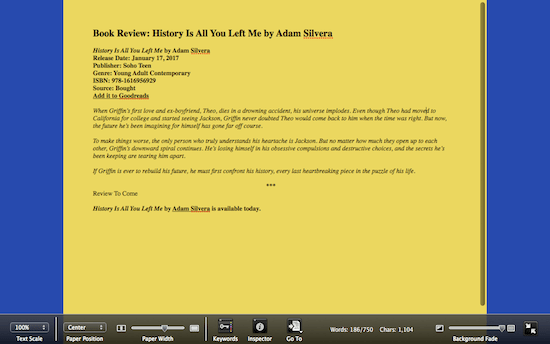
* Distraction-Free Writing – Use composition mode to blackout the background of your screen while you’re writing. The Mac shortcut is Option+Command key+F. You can choose the color of the background (Scrivener > Preferences > Compose > Background), the amount you’d like to fade out the background, the text/background ratio, text size, etc… If you’re drafting book reviews, changing the color of the page and background to match the cover or tone of the book may help set the mood as you begin writing your review.
* Revising – If you want to check what words you’re overusing/underutilizing, use the word frequency tool. Go to Project > Text Statistics > Word Frequency. Plus, if you’re like me and use the dictionary and/or thesaurus often while writing/revising, you can select and right click the word that you want to access > Writing Tools > Look Up in Dictionary and Thesaurus and boom! You didn’t even have to leave Scrivener.
* Backup Your Blog – If you do decide to draft your posts in Scrivener, you’ll end up having a backup of your blog posts. An additional way to backup your blog posts and your entire blog’s work within Scrivener is to set up Scrivener to automatically backup to dropbox. Click here for a YouTube tutorial on that (for both Mac and PC users).
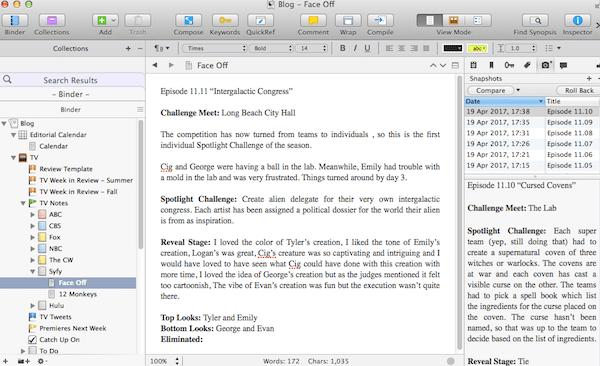
* Snapshots – I use snapshots a lot with my WIPs but it wasn’t until drafting this post that I found a neat way to use them for my blog. I’m not a fan of clutter so I don’t want to see everything that I’ve done if it’s been published and I’m onto the next task. That said, there are certain notes that I need to refer back to. So, I found that I can take snapshots and make episodic notes. It’s a game changer for my TV note taking, that’s for sure.
* Tag Posts with Metadata – I imagine this being a genius way of analyzing statistics regarding how much you write about a certain genre, topic, author, etc… annually (or for whatever time frame interests you). While I haven’t quite mastered metadata, it’s great to know that such a feature exists to use how towards my best advantage.
A Closer Look at My Binder: Books
In looking at the screenshots that I provided above, I noticed that not many of them were dedicated to the book portion of my blog and I know you’re curious to see what’s there. So here you go!
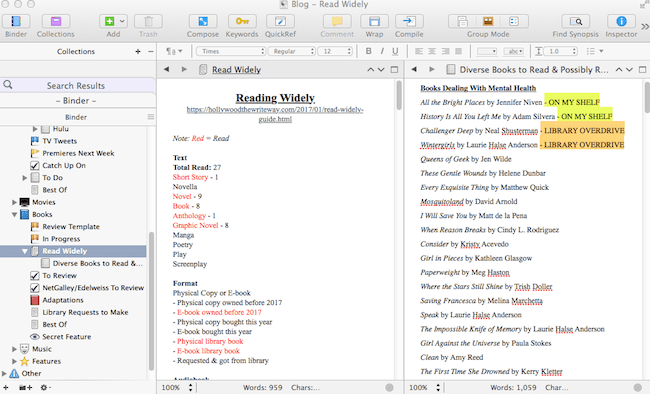
In my attempts to consistently read more widely, I created a guide that breaks down how to accomplish this goal. I track my progress on Goodreads and in Scrivener. That is on the above left. On the right, you can see a list of books that I would love to get to dealing with mental health. May is Mental Health Awareness Month so it would be timely to move these up my TBR and spread awareness. As part of my preparation in determining what to read, I’ve plainly laid out what’s already accessible to me. Then, the list is organized loosely by what order I wouldn’t mind getting to the rest.
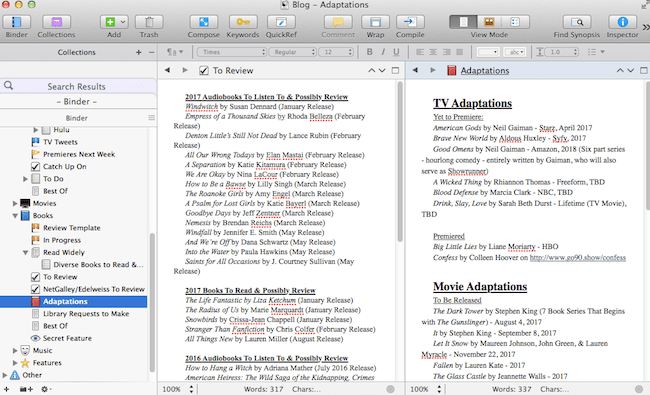
As you can see, I’ve fallen woefully behind in book reviews but just ignore that and see how I’ve organized this. My To Do list is essentially split between frontlist and backlist, with the release month in parenthesis so I know how on track I am (or am not). I also have this pipe dream of being able to be caught up on reading books before their adaptations release, so I’ve created a list to keep track of those titles (which continues down to books that have been optioned – whether or not they ever get made – but you can’t see that in the screenshot).

Finally, we’ve got what’s one of my favorite posts of the year. Jamie’s End of the Year Book Survey is something that I work on throughout the year because if I sit down and try to do it at the end of the year, it will overwhelm me and it won’t get done. I don’t want to forget anything throughout the year, so I take notes on my phone, on scraps of paper, etc… but it all gets compiled here so I have everything that I’ll need when it’s time to seriously draft the post. Since I blog about more than books, a few years ago, I converted the survey to TV and movies so I’m keeping up with those throughout the year as well. You might be able to tell from the screenshot that I’m already anticipating seasons 2 of Insecure and The Good Place to make my favorite TV comedies list. : )
I also wanted to show you the final part of my binder so I expanded that on the left. It’s basically the TTT meme that I participate in when possible, features that I created/am planning, and posts that I need to update. I’ve adopted the green, yellow/orange, red process here as well since that’s easy for me. So that’s it! That’s how I use Scrivener as a writer who also blogs. I hope this has been eye opening and a help to other writers who are bloggers!
Scrivener is available for purchase ($45) through Literature and Latte for both PC and Mac users. I highly recommend the 30 day free trial to play around on this new to you landscape and see if it’s a tool you’d like to add to your writer/blogger survival kit.
What unconventional ways do you use Scrivener? What is your favorite Scrivener feature?

Ooooh! I like this, I use Scrivener for my novel, but I hadn’t thought about using it for my blog.
LikeLike
Thanks for reading! If you do try it out for your blog, would love to hear how you make out! All the best!
LikeLiked by 1 person
I just started using Scrivener for my blog posts, and I love that I can see them all at a glance and know their status. I haven’t thought about keeping my reading log there the way you have, but it’s a great idea! Thanks for this post.
LikeLike
So glad you enjoyed the post! Perfect time to look at this again for spring cleaning/organizing!
LikeLike